
Bob's Studebaker Resource Website
Avanti Moonroof repair
Avanti Moonroof Repair
©1995 Chuck Lampman
chuck.lampman@tuff.gatech.edu
Bob's Studebaker Resource Website
Avanti Moonroof repair
©1995 Chuck Lampman
chuck.lampman@tuff.gatech.edu
Basically, the unit consists of a flat open-topped metal box about an inch
and a half deep, slightly wider than and about twice as long as the glass
panel, as shown in
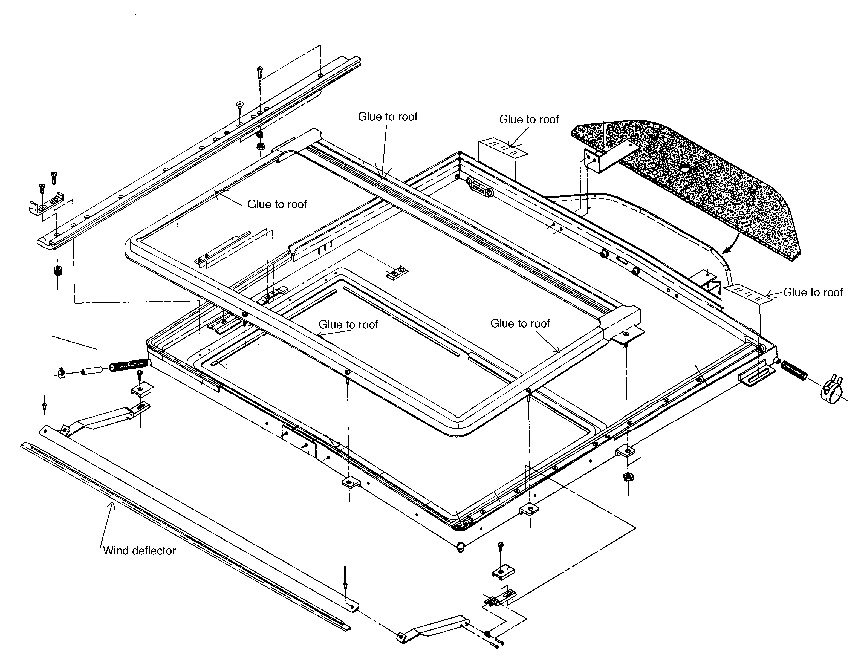 Figure 1,
which is a simplified version of the drawing from the parts manual. Note where I've added
"glue to roof" test.
In each corner of the box is a drain tube; the front two go down the windshield posts, and the rear two go down just behind the quarter windows. (I understand, but haven't verified, that these drains terminate inside the"hog troughs." Now there's a clever piece of engineering!)
A second part fastened to the top of the box forms a flange across the front and part way down the sides of the box, and a flat bar about an inch and a half wide across the box at the middle. This rectangular surface is glued with a strong epoxy to the underside of the roof panel, around the hole in the roof panel. To further anchor the apparatus to the car, at each of the rear corners of the box, about 4 inches forward of the top of the rear glass, there is an"L" shaped brace that is glued to the roof. These support the weight of the rear of the box.
In the front half of the box is a opening into the car, approximating the size of the glass, which is surrounded by a vertical flange. The glass panel fits over this opening like an umbrella, and travels forward and back on aluminum rails attached to the top of this flange.
What we need to understand about sealing the moonroof is thatthere was no intention that the seals around the glass keep all the water out! The seals are there to keep out some of the water, to reduce noise, and to keep the panel from rattling! The water that gets past the seals is channeled, in the box, to one of the corner drains, and out of the car.
The working parts of the moonroof consist of a motor and transmission at the
rear of the assembly, which is accessable through the removable panel on the
headliner just forward of the rear glass; a drive screw extending forward from
the transmission; a nylon block"nut" that rides on the drive screw; and a"
power bar" that extends the width of the box. This assembly is illustrated here
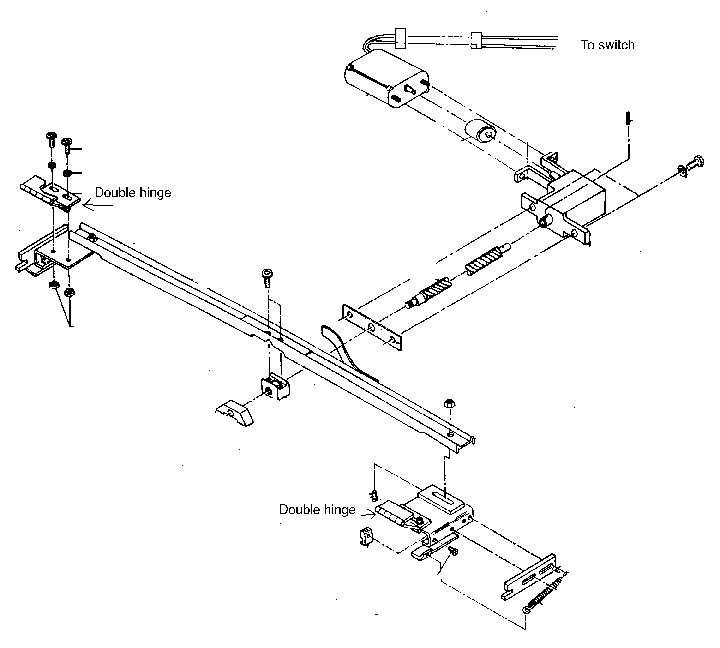 here.
here.
This power bar has a nylon slider on each end that rides on the side rails,
and the drive screw nut is attached to its center. In operation, the reversable
motor turns the screw, and the nut and the power bar move either forward or
back on the side rails, depending on the direction of rotation.
A double-jointed hinge on each side of the rear edge of the glass panel frame
attaches the glass to the power bar. Additional nylon sliders at the sides of
the glass near the front keep the panel on the track. The power bar moves the
glass panel.
At the end of forward movement the front of the panel runs and over and
depresses two flat springs, lowering the wind deflector, and then hits the
seal at the front edge of the opening in the roof. As the panel stops, the
double hinges at the rear of the panel toggle to allow rear edge of the panel
to rise vertically, to become flush with the surrounding frame.
The most common mode of failure of these moonroofs seems to be failure of the glue holding the rear supports, which are just forward of the rear window, to the under side of the roof, allowing the rear of the box to drop. The extra weight then causes the glue around the rear of the roof cutout to fail, and the entire rear of the box drops away from the roof to rest on the headliner. The result is an opening at the rear edge of the moonroof opening, where the rear edge of the roof is glued to a metal bar that runs from side to side of the box. Water can then get on top of this metal bar, run out to the sides, leak out past the box and down into the headliner.
A second failure I have seen is that the glass seems disconnected from the mechanism- it can be moved back and forth manually. This occurs when the small roll pin that anchors the drive screw to the transmission output shaft falls out.
Let's fix it!
Repair generally consists of removing the glass panel, and the aluminum solid
panel which is under it, cleaning the rust from the area around the opening
and from the rear support feet, and then regluing both to the fiberglass roof
panel. We'll then replace the front and rear seals, before reassembly. Except
for access to the rear support feet, all work is done from the outside of the
car- removal of the headliner is not necessary.
Parts are available from Nostalgic Motors in Michigan; SkyTop no longer has
them available (Written in 1995 when ST was still around.) If you buy
the parts from him, Dan Booth at Nostalgic will even talk you through the panel
removal (by appointment) should you feel you need it. I paid about Nostalgic
about $80 for the front and rear seals, and a large two-part kit of JBWeld.
The large kit, for about $16, is the equivalent of six or eight of the little
ones that you'll pay $4 - $5 for locally- I used over half of the big kit on
my repair.
Start by moving the solid aluminum panel all the way back (open); then move the glass about three forths of the way back. Remove the wind deflector attaching screws (one on each side), and the wind deflector. Mark the position carefully so you can get it back exactly where it was.
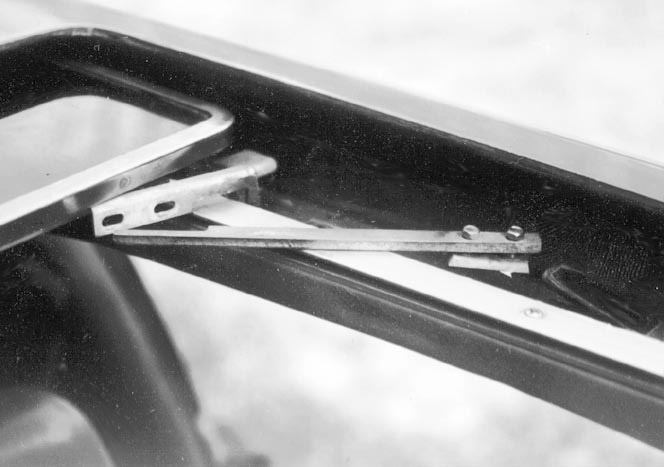
On each side of the opening, screwed through a bracket that is attached to the
bottom of the box, are metal slide stops; carefully mark their locations, and
remove them, along with the tapped blocks, located under the brackets, into
which the screws go. Use the markings when reinstalling, to get things exactly
back to where they were. Here's a picture of the parts we're talking about.
Looking back along the track under the glass on each side you will see two screws that attach the glass panel frame to the track slider mechanism; remove these screws and the slider mechanisms from each side. (Note: on my car these, and the hinge screws, were not standard Phillips head screws; a Reed-Prince screwdriver and a lot of pressure were required!)
Put a terrycloth towel over the roof in front of the opening to protect the
paint. Run the window forward; as it gets a couple of inches from the closed
position, lift the front edge of the glass. Continue running it forward so the
panel comes out over the edge of the opening to rest on the towel, a couple of
inches beyond the normal closed position.
Attached to the rear of the glass panel frame is a heavy rubber weatherseal
flap; lift the flap on each side, and remove the two screws holding each hinge
to the power bar. You may now lift the glass panel out of the car.
Slide the aluminum panel forward; press slightly upward in the center, arcing the middle of the panel until the edges come out of the tracks; remove.
The next step is to reglue the box opening and rear supports to the roof, and the amount of work will depend on your individual circumstance. My separation was along the back edge of the opening in the roof, and about 4 inches up each side. I used a hacksaw blade by hand, with a rag around one end, to remove the old glue on the roof panel and rust on the metal, and to get as far up to the front of the separation as possible. I actually sawed at the point of separation, so the saw kerf would give me an area into which to work the glue, for a solid joint. A 36 grit sanding strip was folded several times to give a pad about an inch thick, and when worked back and forth in the opening between the roof panel and the metal bar, it took off rust on the bottom and glue on the top at the same time. Unfolding it to thinner levels allowed me to get into the narrower areas near the ends of the opening. I used MetlPrep- a phosphoric acid metal conditioner that removes and stabilizes rust- on a rag, followed by a rag wet with clean water, to clean up and stabalize the rust that I missed. The project was allowed to dry in the sun for a couple of hours to be sure things were dry; a heat lamp would have done as well.
Getting at the rear supports required removing the inspection panel at the rear of the headliner, then working the leather-covered cardboard headliner down out from under the rear window gasket, from one side of the car to the other. (On my 84 the entire headliner then slipped rearward from the roll bar and came out, making the rest of the work a snap. the remainder of this paragraph was written for my 83, where the headliner seemed to be glued under the roll bar. Your mileage may vary!) You can pull it down a little in the center to gain access, but don't pull too hard. This part is difficult- you have to be a bit of a contortionist- but I found that the pad of 36 grit paper could be slid back and forth between the roof and the support enough to clean and rough things up enough for good "tooth" to hold the glue. It's a bit awkward reaching up inside the headliner- if you have a willing eleven-year- old with small arms, you might want to seek his/her help!
If your glass panel moved manually from being detached from the drive mechanism, this is the time to fix it. Working overhead through the headliner access panel, remove the two bolts that hold the transmission to the rear edge of the box, and slide the transmission and motor assembly to the rear. If the long drive screw came with it, fine; if not, have somebody outside the car guide it backwards toward the transmission. There is a hole drilled across the end of the drive screw shaft, and there is a socket with a hole through it coming out of the front of the transmission. Put the screw in the socket, line the holes up with a small nail or the like, and put a size"A" (1/8" by about 3/8") roll pin through the holes. Reattach the transmission assembly to the rear of the box.
I then glued up the rear supports, slathering a putty knife full of glue under each support, then rigging a support to exert upward pressure. Small wooden blocks on the headliner (one on each side, directly under the supports) prevented marring, and sticks wedged tightly between them and a piece of board on the seat allowed the rear seat cushion to exert upward pressure overnight for curing.
Once the rear was done, and the box was raised to it's normal position, I
glued the opening around the roof cut-out. I used
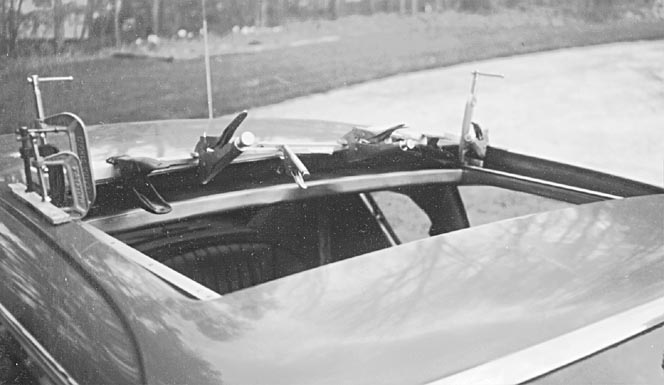
C-clamps and vice-grips
with small individual wooden blocks to protect the finish. To maintain the
curvature of the roof I used a total of 8 separate clamps across the back edge
of the opening, another in each of the rear corners, and another on each side
forward of the corner, for a total of 12 clamps. I found that you must be
careful not to tighten the clamps any more than you need to close up the
gap - otherwise you'll create a series of flat spots corresponding to the
wooden blocks, instead of a smooth arc. I glued the whole thing, then applied
the clamps starting in the middle, then doing the corners, then filling in
blank spaces. Individual clamps were then removed and replaced one at a time
to clean off the glue that had been pressed out. The JBWeld cured overnight,
and the clamps were removed next morning.
The front seal is a rubber strip similar to door weatherstripping, and is glued just inside the opening in the top; it runs along one side, across the front and back the other side. The ends are slightly long, and are glued in place back inside the opening at the rear corners. Pull the old one off, clean up the old adhesive with lacquer thinner, sand lightly as necessary for good adhesion, and glue the new one on with a good grade of trim adhesive or contact cement. Pay attention to the orientation of the lip on the seal- make sure you glue it on just like the old one.
The rear seal is attached to the rear edge of the glass panel frame; it is glued to the frame full length with contact cement, and held in place at the ends with a 1/8"x 1/4" pop rivet. (A small nut and bolt, with LocTite, could be substituted if you don't have a pop riveter.) The seal is a sheet metal strip covered with black fuzzy material, and with a plastic bead at the top edge; your old one will be mostly gone, but the sheet metal part will probably still be attached to the glass panel frame.
The new seal as supplied requires trimming about 1/4" off the entire length of
the bottom of the seal, except for the ends, in order to clear the hinge.
Remove the pop rivets and take the old one off carefully to use for a pattern.
In the finished product, the bead is at the top, the metal part of the seal
is flat against the panel frame, and the bead is facing out. The top of the
bead should be exactly flush with the panel frame, or it'll stick up above the
panel when it's on the car. Tilt the ends of the seal down slightly (about 1/8")
, so the bead drops below the top of the panel, before riveting. In the photo
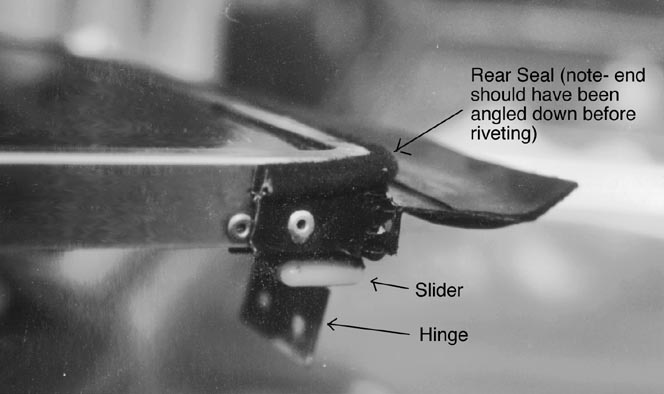
you'll see I didn't do that, and the end of the seal is slightly visible with
the panel installed.
I took the opportunity to paint the back of the aluminum panel, reglue some of the leather covering that had come loose, and do some general clean-up work. A little lube on the rails and drive screw wouldn't be out of place. With the seals replaced, reassembly is exactly the reverse of disassembly, and isn't a big deal. Be sure to get the guide stops and wind deflector back exactly where they came from. There seems to be little room for adjustment in either of these pieces, but I figure they were in the right place when they came from the factory, so returning them to that place is a good idea.
All done!
Not more than a few hours work, and we now have a moonroof that works and looks like it did when it came from the factory!