
Bob's Studebaker Resource Website
Evacuate and Recharge Your A/C By Dave Spencer Notes: This faq will show you how to completely evacuate and recharge
your A/C system. A thorough evacuation is necessary after
servicing or replacing system components or when converting to
Freeze 12, R134a, or any other refrigerant. It simply shows
the steps required to draw a vacuum on the system to remove
moisture and other contaminants and charge the system with oil
and the refrigerant of your choice. The necessity of
properly capturing any refrigerant already in the system must be
noted. You really should do yourself, the rest of us, and
the environment a favor and have that stuff removed and recycled
by someone with a lot more experience and the proper equipment.
Of course, if you have already had this done, you can skip over
all the vacuum pump stuff and move on to the “just make it
cold again” stuff. The faq is also not intended to be complete “how to”
for conversions although the evacuation and charge procedures
will be the final steps in any conversion. Only the
connectors will be different. The processes described here involve toxic chemicals under
high pressures. Please read the instructions that come with
any equipment you purchase, rent, or borrow. By all means,
please be careful and enjoy a frosty beverage AFTER you have
completed the work. Two final things: Do not take this article as an advertisement
for Freeze 12. It is simply what I was using on the day the
pictures were taken. I used it as I have had success with
it in the past and I didn’t want to replace anything more
than the refrigerant and oil. R134a is probably a better
long-term solution and there are other refrigerants available as
well. Do your research and choose the one that best fits
your needs. I also am far from an expert on these things.
Please feel free to submit corrections and/or additions to this
document. I would like to see this grow to include the full
conversion procedures and upgrades. Stuff You Will Need
Connect the yellow line to the
vacuum pump and ensure both the high and low side valves on the
manifold gauges are closed. Read the instructions for the
vacuum pump before turning it on and make sure it has oil in it (doesn’t
apply to the air driven venturi type). The pump I used had
very specific instructions for starting. It required
opening a valve on top of the pump, starting the pump, then
closing the valve. After the time has passed, close
both the high and low side valves and turn off the vacuum pump
following the shutdown procedure for the pump. You can then
disconnect the yellow line from the pump satisfied that you have
removed all of the air and moisture from the system. Adding Oil Your compressor
needs oil to function. The oil used is carried through the
system by the refrigerant and chances are you lost some while you
were servicing things. If you are doing the R134a
conversion, you should remove the compressor and drain all of the
existing mineral oil, as it is not compatible with R134a. You
should also replace the receiver/dryer. Measure the amount
of oil contained in each by pouring it into a suitable container.
I was replacing a damaged receiver/dryer so I just measured what
was in it and purchased enough to replace it. If you have
the compressor or receiver dryer off, you can simply pour the oil
into them before installation. Small cans of the proper oil
can be installed using the newly created vacuum to pull the oil
into the system. The car should
not be running at this point. Using the can tapping valve,
connect the service line, opened the valve on the can and cracked
the service line connection at the manifold until oil started to
leak out to purge any air out of the service line. Holding
the oil can upside down (valve down), open the low side valve on
the manifold gauge. The vacuum will pull the oil into the
system. When you have determined the can is empty, close
the low side valve and the valve on the can. You should now
be ready to charge the system. Start the car.
Turn the A/C temperature control to its highest setting, and the
fan to low. Allow the car to idle like this for about five
minutes to settle the pressures and temperatures in the system.
During this time, connect a can of refrigerant to the can tapping
valve and connect it to the service line on the manifold gauges.
After the system has stabilized, turn the A/C fan to high. Open
the valve on the refrigerant can and purge the line like you did
with the oil. Now open the low side valve on the manifold
gauges. I usually put the refrigerant in as a liquid.
Invert the refrigerant can to do this (valve down). When
doing this NEVER OPEN THE HIGH SIDE VALVE. The system is
not capable of compressing the liquid. When the can is
empty, shut off the low side valve, shut off the can valve, and
remove the can from the valve. Repeat with the next can as
necessary. It will probably take two or three cans (depending
on the refrigerant you use) to fill the system. You can
consult the Haynes manual to learn how to use the gauges to
determine when the system is full or just use the sight glass on
the receiver/dryer. The sight glass is very easy to use:
keep adding refrigerant until you stop seeing bubbles in the
sight glass. (Note: if charging with R134a and stock condensor,
you may not be able to get a full sight glass before you've
reached the high limit of condensing pressure. A good rule of
thumb with R134a is to run fan on High with all windows open and
engine at 1500 rpm. High side pressure in PSI should be about 2.2
to 2.5 times outside air temperature in degrees F. Example if
it's 90 degrees F, high side should be no higher than 225PSI. -
Peter Florance)
Less if you purchase them used.
Not too bad when compared the what you would pay someone
else to just top your system up and you can use them to
diagnose problems with your A/C (refrigerator, etc.)
later.
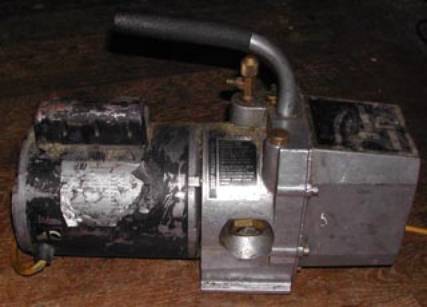
Vacuum Pump - These things are fairly expensive.
Stand alone units start in the $250 range. There
are air driven ones available for about $50, but you need
a compressor capable of delivering 80-100 psi
continuously for over half an hour. This burns up
tons of electricity and is very noisy. I was able
to borrow the one pictured below. You may be able
to rent one.
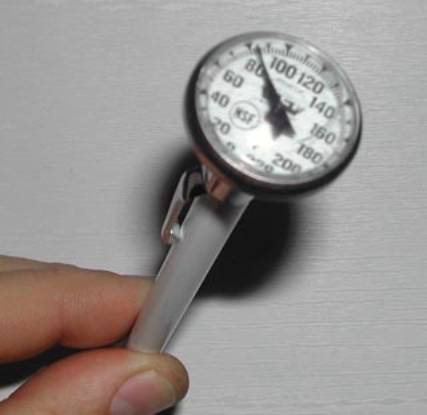
Small Thermometer – You may already have one of
these in your kitchen. Handy to have and they only
cost a couple of bucks. You will use this to
measure the performance of the system when you complete
the charging.
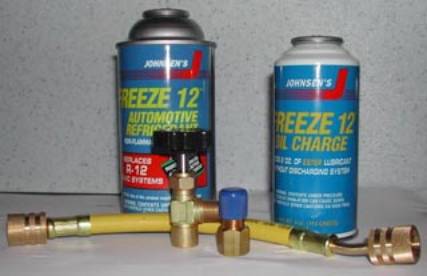
Refrigeration Oil, Refrigerant, and the connections
required for dispensing them. Freeze 12 is
pictured, but the basic setup will be similar for R12 (good
luck finding it!), R134a, and any other refrigerants.
Each refrigerant is required to have a unique fitting to
prevent mixing different types. The thing with the
blue cap is a fitting to convert the standard R12 fitting
to the Freeze 12 fitting. Also make sure the type
of oil you purchase is compatible with the refrigerant
you are using. Again, do your research!
Haynes Automotive Heating & Air Conditioning Techbook
– This is a great book. It goes into much
greater detail than I do here. It also provides
troubleshooting procedures.
Evacuating the System
I will assume you have replaced the part that got you to this
point already and have checked all of the system plumbing for
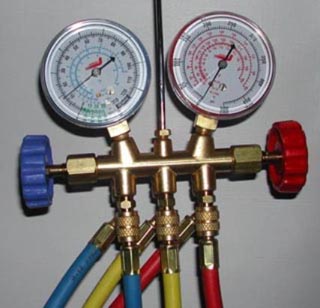
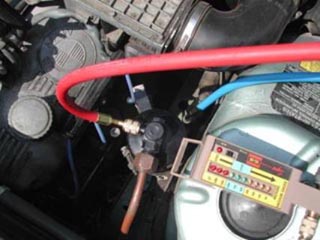
tightness. The first thing to do is get the gauges
connected. Nothing tricky here. You just have to
identify the high pressure side and low pressure (suction) side
of the system. On the E12, the high pressure valve is on
the receiver/dryer bottle and the low pressure valve on a line
just below and forward of the receiver/dryer. The blue hose
from your manifold gauges goes on the low side. The red one
goes on the high side. There is a yellow line coming from
the gauges as well. It is the service line. It is the
one you use to pull things out of or put things into the system.
The photo also shows a nice vacuum gauge I borrowed from the same
guy I got the pump from. It wasn’t needed. The
manifold gauges will tell you all you need to know.
I started this process by purging my system with compressed
nitrogen. This may not be practical unless you know someone
with a cylinder. If you do, it is a good idea. It is
inert and works as a good pressure test to check for leaks.
When cranked to 200 psi, you'll know if you have any leaks.
Hisssssssssss. If you don’t have access to
compressed nitrogen, don’t sweat it. Deep vacuuming of
the system will get all that nasty moisture out of the system
anyway.
 After starting the pump,
open both the high and low side valves on the manifold gauges.
Verify the low side gauge indicates a vacuum (picture at left).
The low side gauge indicates both pressure (psi) and vacuum (in/hg).
If it does not go below zero, you have a sizeable leak and will
need to correct it before you continue. Assuming you are
showing a vacuum, let the pump run for five minutes, close the
high side valve, and turn the pump off. Note the reading on
the low side gauge. Wait five or more minutes and then
check the reading again. Any decrease in indicated vacuum
indicates a leak that still needs to be corrected. If this
happens, check the connections to the gauges and pump first.
Once you are satisfied there are no leaks, turn the pump back on,
open the high side valve again and let the pump run for at least
thirty minutes.
After starting the pump,
open both the high and low side valves on the manifold gauges.
Verify the low side gauge indicates a vacuum (picture at left).
The low side gauge indicates both pressure (psi) and vacuum (in/hg).
If it does not go below zero, you have a sizeable leak and will
need to correct it before you continue. Assuming you are
showing a vacuum, let the pump run for five minutes, close the
high side valve, and turn the pump off. Note the reading on
the low side gauge. Wait five or more minutes and then
check the reading again. Any decrease in indicated vacuum
indicates a leak that still needs to be corrected. If this
happens, check the connections to the gauges and pump first.
Once you are satisfied there are no leaks, turn the pump back on,
open the high side valve again and let the pump run for at least
thirty minutes.
Charging With Refrigerant