| Author |
 Topic Topic  |
|
|
Lark Parker
Regal Member

USA
260 Posts |
 Posted - 03/03/2008 : 5:59:50 PM Posted - 03/03/2008 : 5:59:50 PM


|
This is probably the last of the series on Stainless restoration. It isn't everything I know on the subject -- but it is everything I have the patience to present. <g> These things do take a fair amount of prep time for such a limited group.
In searching eBay I found that a search for "Wow" in the title got over 400,000 items and "Rare" had over 1,300,000 items. I tried putting both words in the last (Stainless Restoration #9) title but it didn't seem to help the 'hits'. S.R.#9 wasn't wow or rare -- but neither were the eBay items. Now I freely offer the following:
Here ya go!
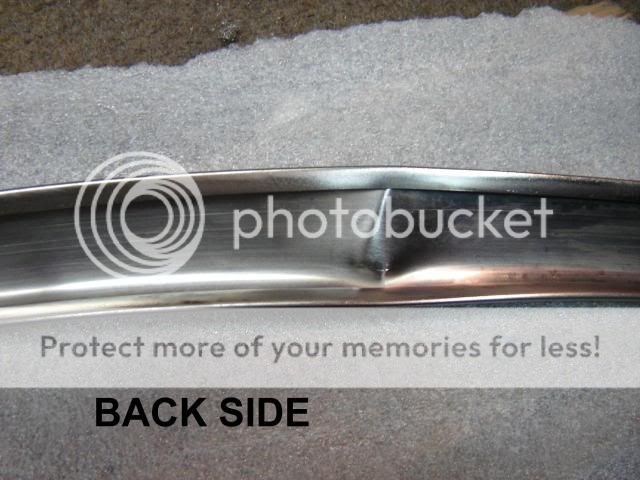
We are using a Hawk wheel well trim for illustration.
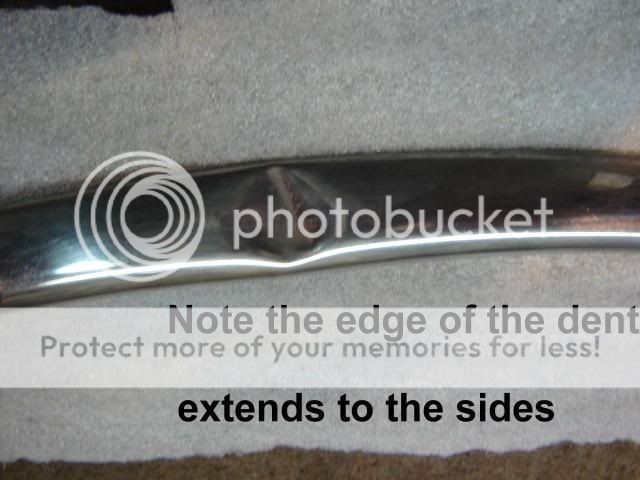
One of the problems in removing dents from stainless is reaching the back side of the dent that extends under the edge lip that the clip fits fastens under. In addition, the lip has been closed down and there is no crack to fit a prying tool edge under.
Sometimes this lip will need to be lifted in order to enable sliding the clips to the removal opening. (Removal this way is always preferable to bending the lips up to remove the clip.) In some bad cases where the removal problem is from clip rust rather than dent distortion, I would rather cut the clip with a Dremel blade than bend the lip.
The usual beginner's attempt is to stick a sharp screwdriver in alongside the closed area and twist in order to pry the lip up and then work along the edge in an old fashioned can-opener action.
If one does fit a prying edge under the lip, the probability of inflicting a reverse dent (outwards bump) is 100%.
Negatory Noodnik! -- now you have broken the stainless physician's creed to "Do no harm to the patient".

The tool I made for the lip lifting action has a sharp edge for insertion and also a pinching action to force it in without disturbing the finished surface.
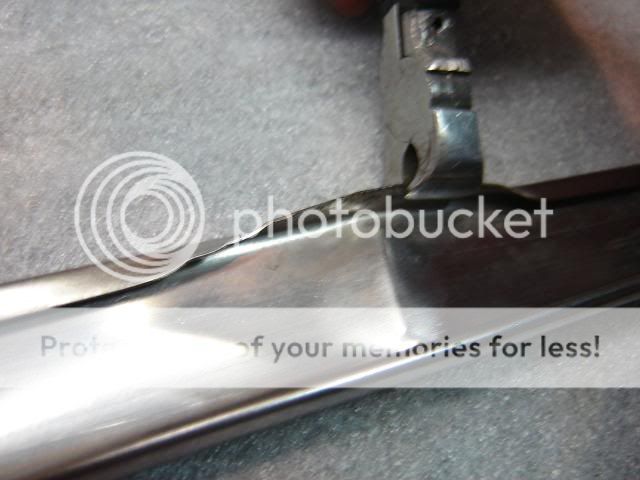
Then it clamps on the lip to hold on as you bend it outwards to provide access to the damaged area.
If you are only doing one or two jobs, you might get away with not needing such a tool. For any more jobs you will certainly get your time back by making the tool.
Besides, who doesn't like making a special tool?
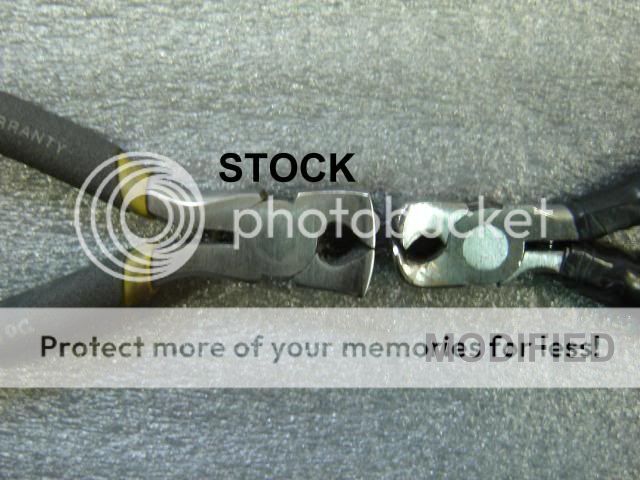
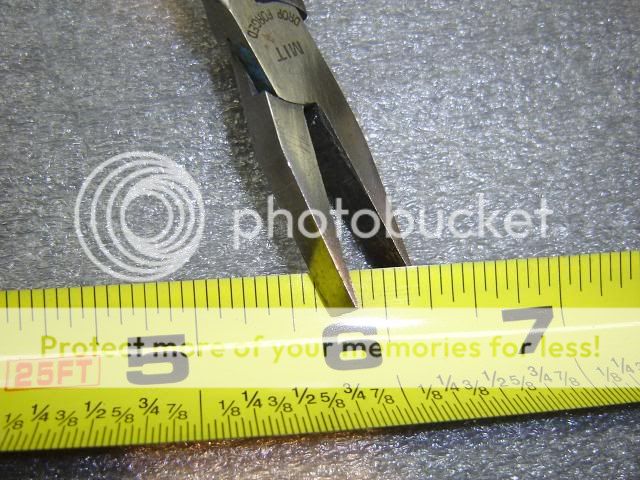
This tool, next to the hammer, gets used more than any other I own. It is made by modifying a small pair of end cutters so that the jaws overlap with a rubbing fit, and the back is contoured to fit into narrow spaces. In using, the thin sharp longer jaw slips under the lip of the trim and the thicker, slightly shorter jaw will be on the visible "out" side.
Go easy. It takes a little care while learning to use. The pinching action is powerful.

For Hawk wheel well trim the tool has been a must. It also sees routine service on those Lark trunk lid strips and any other narrow stainless.
The jaws were shaped with a Dremel tool using the 1" thin cutter blades to reach the inside curve. Take some care to select a pair with a jaw "fatness" you like when picking out the end cutters to be reshaped. Reshaping has to go slowly with frequent trials of grabbing a thin stainless edge. If you take too much off and lose the close jaw clearance --- the handles will meet at the end and/or the jaws won't grip well. Round the four corners of the jaws a little. Removing material from the jaw backs helps close quarters access.
The cutters I like for this purpose have come from the Do-It-Best Hardwares, about $4. The small Craftsman cutters with the fancy handles are very BAD for this purpose. Clearly the mfg warranty is no longer any good but, once made, they last until you lose them or a visitor accidently takes them.
As a substitute, these small duckbills can be used to bend back a lip but but they won't work a lot of the time because their straight shape won't allow you to reach in.
Don't bend the lips back down again until you have completed at least the first buffing step. The buffing will show where more straightening work is needed and you don't want to bend this lip up and down but one time for obvious reasons. They will actually stand about five bendings --- but you still have the stainless physician's creed to adhere to.
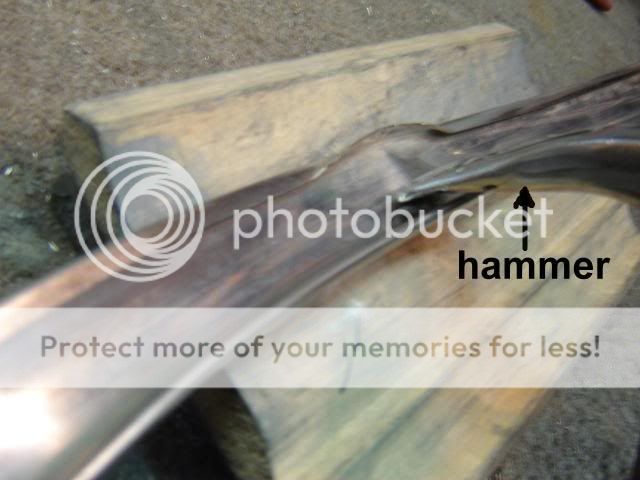
The lip can be bent back down by hammer tapping and using the PlaySkool clay for backing. When you have completed tapping, test the piece to see that the mounting clips will have installation clearance. The tool you made can be used to help straighten the finished lip.
Also, make sure that the li[p edge is down so that it won't gouge the new paint.
*There was a distinct lack of response and interest in woodpecker lips as related to the evolution of the wood duck that was discussed in S.R. #7. These are critical to appreciating the history and nuances of stainless restoration.
Other Stainless restoration discussions can be found at these addresses:
https://www.studebakerdriversclub.com/sdc_forum/topic.asp?TOPIC_ID=15898
https://www.studebakerdriversclub.com/sdc_forum/topic.asp?TOPIC_ID=16092
https://www.studebakerdriversclub.com/sdc_forum/topic.asp?TOPIC_ID=15554
https://www.studebakerdriversclub.com/sdc_forum/topic.asp?TOPIC_ID=15349
https://www.studebakerdriversclub.com/sdc_forum/topic.asp?TOPIC_ID=15234
https://www.studebakerdriversclub.com/sdc_forum/topic.asp?TOPIC_ID=15153
https://www.studebakerdriversclub.com/sdc_forum/topic.asp?TOPIC_ID=15021
https://www.studebakerdriversclub.com/sdc_forum/topic.asp?TOPIC_ID=15067
https://www.studebakerdriversclub.com/sdc_forum/topic.asp?TOPIC_ID=16194
 Lark Parker Lark Parker
If at first you don't succeed -- you will get a lot of advice.
|
|
|
52-fan
Regal Member
USA
287 Posts |
Posted - 03/03/2008 : 7:57:00 PM
|
Lark,
I am sure it's been said before, but THANKS for going to the trouble to take the pictures and write up these articles on stainless restoration. I may never restore any trim myself, but if I do try it I will have a better chance of a quality job.
1952 Champion Starlight, 1962 Daytona, 1947 M5. Searcy,Arkansas |
 |
|
|
KGlowacky
Regal Member
USA
473 Posts |
Posted - 03/03/2008 : 8:50:01 PM
|
| I also want to Thank You. I have indeed used your tips to clean,straighten and polish my SS. It turned out well and I learned a great deal. |
|
|
|
Karl
Regal Member
USA
387 Posts |
Posted - 03/03/2008 : 10:37:24 PM

|
Great information. Thanks Thanks
 |
|
|
|
rockne10
Commander Member

USA
2430 Posts |
Posted - 03/03/2008 : 10:55:39 PM
|
Dale,
I doubt many will create the tools you have to repair their own project. Maybe someone will, and carry on per your direction. I can say what you have shown us not to do is a quantum leap in our process.
This Bud's for you. |
|
|
|
N8N
Commander Member
USA
3160 Posts |
|
|
hopinfox
Starlight Member

USA
50 Posts |
Posted - 03/04/2008 : 06:53:21 AM
|
Thank YOU for sharing your hard won knowledge.
M.hopinfox/Kennesaw,Ga.
62 Hawk
63 Champ
64 Commander
64 Hawk
jealous wife |
|
|
| |
Topic |
|